40.0
Take and make better photos with iPhone
Introduction
Mobile phones are almost like computers if not the same and its apps are like softwares. There are many applications in the app store that sometimes its hard to find the right one and always if we find it we need to spend a lot of time trying it out and see how it works. We are familiar with some of the most common applications like Instagram from Facebook, but what about the rest? I personally get asked how did you do that with your phone by many people and I wish they knew that app is free and incredibly easy to use.
Having studies photography and practiced it gave me the idea to write this book and teach people many of the photography applications that are available to us in the App Store
We use photography almost everyday and there are billions of photographs that we capture all around the world and we use cameras of all kinds and shapes. One of the most popular cameras are the cameras in or phones. It is believed that there are more photos taken with iPhone than any other camera.
Cameras don't make the photographer take better pictures, the art of taking photos is all about understanding how great the subject is and the overall composition of the image. Everybody can take a photo today but what makes a photo stand out is the color, light and the ability of the photographer to capture it in the right way. We may think sometimes the bigger the camera the better it is or the more pixel the better it's eh picture but we always forget that it's not about these factors that makes the best results.

On a recent trip to Italy I took lots of photos with my camera a Canon 5D MK II and also lots of photographs with my iPhone 5S. I have noted that for trips the iPhone is the best camera you can take with you. It has enough pixel for prints as big as A4 and it is small enough to fit in your pocket, best of all you don't need a manual or lots of knowledge to know how to rake a photo with your iPhone all you have to do is simply shoot at the subject and instantly you have the result in your photo library in your phone.
The iPhone camera is one of those cameras that is really simple to use. Whats great about the iPhone is that it integrates a camera that is not hard at all to use a really fast processor that lets you photograph constantly with no need to stop saving photos and what is best is that the photograph taken with your iPhone doesn't just stop there, it can be shared with others and made even more interesting directly inside the iPhone with the use of many applications that are available directly into the app store.
The app store as we know offered hundreds of thousands of applications but we don't know what they are and what they exactly do. This publication is designed to help beginners knowing how to take better photos with their devices and which applications to use to achieve great results.
What I find great about the iPhone is that the it offers a new device that is constantly evolving and brings us a new level of quality in almost everything that it can offer. From the first iPhone to todays device there has been a huge improvement with the quality of the photography and we know that photography is always growing and getting better and better inside our phones. The quality we get from a photograph taken with a phone today is almost incredible and we hardly distinguish it from a photograph taken with a compact camera. Cameras on mobile phones are defiantly going beyond our expectations, but we need to know how to use those and how to use the new softwares inside these incredible devices.
Through the years that I have studied photography I have learned to take several photographs of the same thing and then you have a vast choice of photographs to chose from. If you take a photo of a landscape and it is the an important moment you want to remember you might want to make sure you remember it with a photograph that it's correctly executed. Even with mobile phones we need a sort of degree of accuracy and we need to learn how to use photography at its very best.

When you take a photo always remember that the camera it's not like your eyes that adjusts to the light almost immediately it takes a little bit more and by saying so you need to point the camera at your subject, let it stabilize and make sure that the amount of light is just right.
Once you have achieved all those click the shutter several times by keeping the camera steady in your hands or in huge case of the iPhone 5s simply hold the shutter on the screen or the + volume button down so that the phone can automatically take several images.
Once you have a series of photos sometimes you might think that it's basically it and you just print the images as they are and you put them in a photo book.
Through experience that I had with my loved iPhone I have always looked aft ways to make photos that may not be that interesting more appealing by using filters and effects that are stored inside the iPhone and many other applications that we will look inside this book.
The iPhone 5s Camera
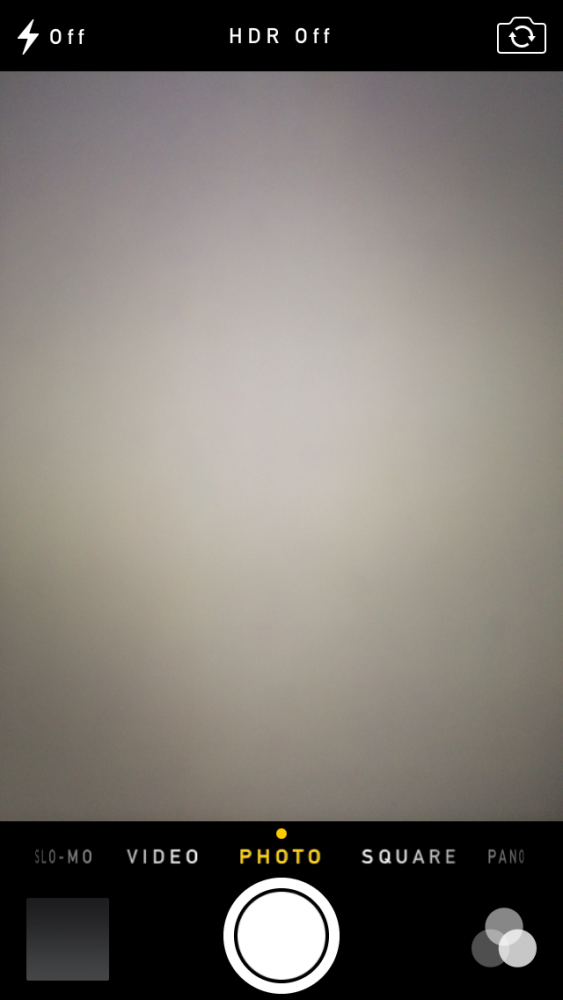
The iPhone camera application is at the basis of this book. It has many great features that we will be looking in this chapter.
Let's go and open this inbuilt application and have a look at the basics of the camera. Since the introduction of iOS 7 there have been several improvements and new features especially in the iPhone 5s.
At the top there are the basic functions, these include flash, HDR and the option to reverse the camera tot the internal camera. The internal camera has a lower resolution of the external camera so for best resolution always use the external camera.
In the center and the majority of he application is where you are going to see where you are going to see what photograph you want to take. There is a big circular button in the centre at the bottom of the app and this is the shutter. You can simply click the shutter or click once and hold to take several shot and then pick the best one.
Once you have taken a photograph you will find that there several photos that have appeared on the bottom left corner, this is a quick shortcut to the camera roll. The Camera Roll is where you will find all photographs that you have taken with your phone as well as photographs that you might have saved from messages or emails. If you want to have a quick look and then go back to the camera this is the fastest way to do that. You can still share, edit and delete photographs directly from this shortcut that is built directly inside the camera.
Inside the camera application just on the right bottom right side is where we can find three circles which create different effects to the photograph you wish to take. The effects are applied directly to the image you will take and there is no way to remove those. My suggestion is always to photograph with no filters and apply whatever effect you want to the image later. In this way we will ensure that an original copy of the image is saved separately from the one with the effect.
So how to take a great photo with a simple camera.
Everything we photograph has a reason but it's hard to capture it always the right way. When taking photos it is important to focus correctly and determine if the light on the subject is falling correctly. A trick is to take photos of the same subject several times and pick the best photograph later and always check your photos while you take them so it will never happen to go back home and say I wished this photo came out properly.
Taking a photograph correctly its not simple even with a phone so we are going to take a look at some of the features inside the inbuilt Camera App inside the iPhone 5s.
The camera of the iPhone 5s has a 8 megapixel sensor which is sufficient to print as big as A4 so it is
Hipstamatic
Another application we will be looking at is the application called Hipstamatic. This application is essentially the same as Oggl with the only difference that this application doesn't allow us to import photos but it is a camera application which shoots with the films and lens that you preselect and automatically applies the effect of the film and lens combines directly to the final result.
All film and lenses come as a packs these usually include a lens and a film. The combination of these packs is combined to give you a specific look but the more packs you have the more effects you can achieve. There is a sort of guessing for the result you want to get and this will come only by experimenting with the application.
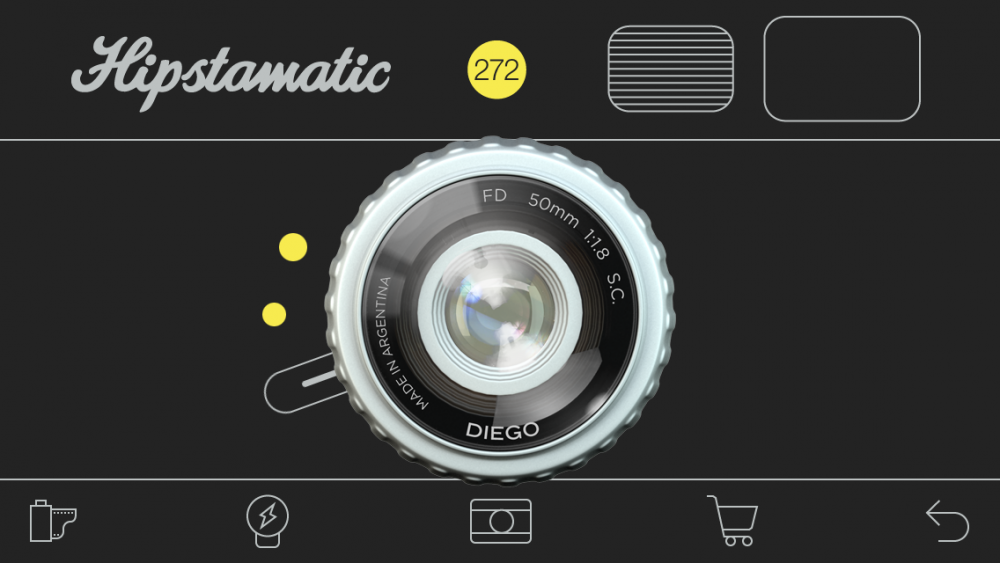 Now there is a front and back of this application, at the front we can see looks like a real camera but there is a lens and a little knob with three dots on the left side of the lens. This knob controls the size of the image that will be saved. If we shoot with the knob positioned on top of the big dot the image will be a bigger file which means that this file will be at the fullest of its resolution and it will print with no visible pixels at its maximum size.
If we swipe left to right on top of the lens that it's selected we will see that we can change lens and this will change the result of the effect we are trying to apply.
At the bottom of the lens thee is a wide selection of that we are going to have a look now.
The first one on the left is a film canister. If we select this canister we will find that here is where all films that come with the application and the future in-app purchase films are stored. If we swipe top to bottom on this area we will be able to choose the right film that we can then use together withy the lens that we have previously selected.
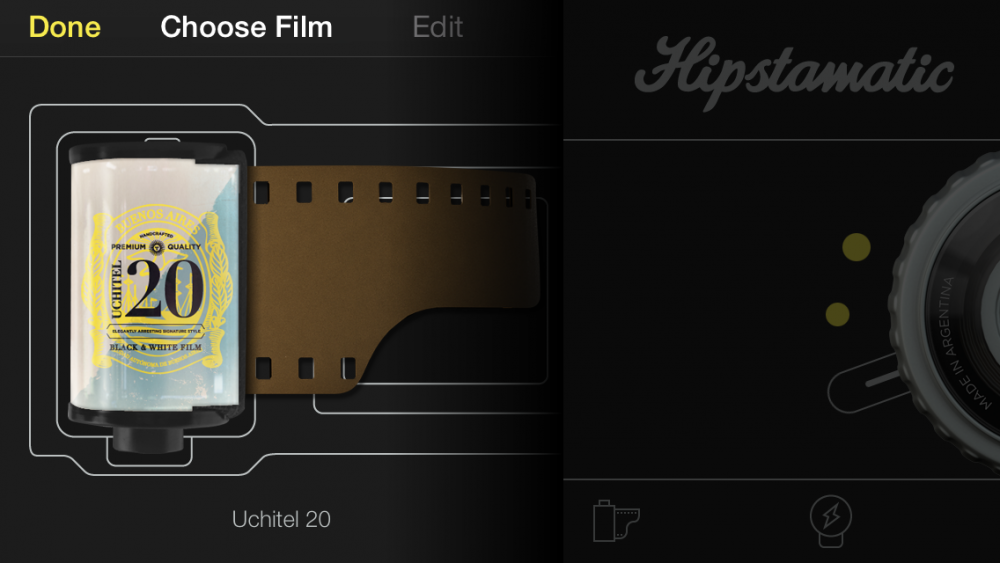
As this is the first time we use this application we can be taking a bit of a guess on which one to select once you have finished and selected your film simply click on the "done" at the top left corner of e application.
This camera also has the ability to use the inbuilt flash of the camera and apply colors or effects st are created with flash light almost like when we photograph something with a Holga plastic camera. The Holga cameras are cameras which are designed to let light leak thought the back and front of the camera and the flash of those cameras has a light that can be simple white or colored like with red green or blue. The difference from the Holga camera to this application is not that much, the main difference is that this application in the iPhone process the file digitally and we have a guaranteed result instead with the Holga camera everything we do is basically analogue and we won't have any idea of the image until we get it back from the processing lab.
Lets have a look at the different types of flashes and how we can select one that will do for us.
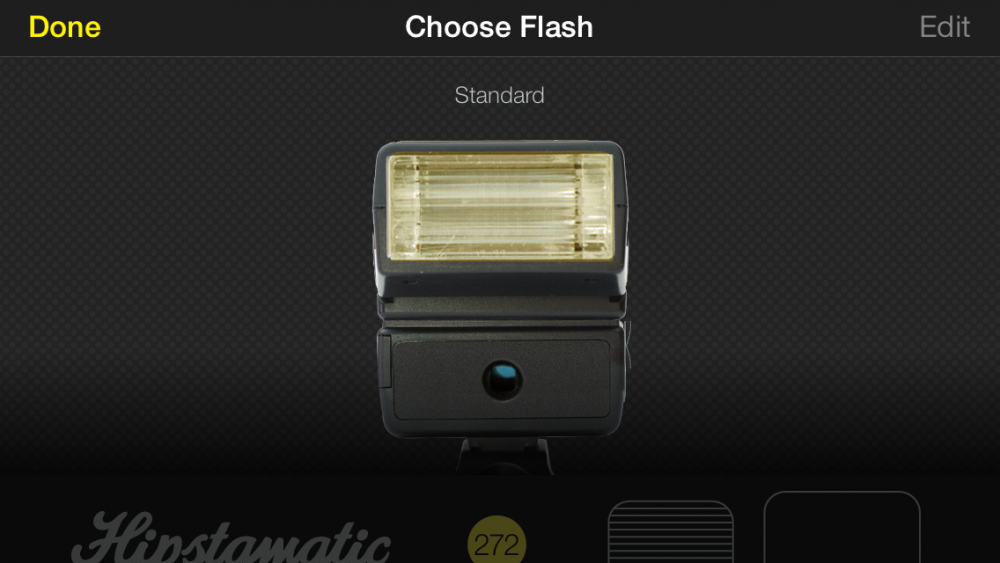
If we swipe left and right we can see that there are many types of flashes we can select from. Provided that we have purchased a pack that contains more flashes than just the standard one. Each flesh will have a different effect but we need to take a bit of a guess here as well as it is the first time. You might decide the flesh now but decide not to use it immediately. This is because every time you take a photo you can decide to have it on or off depending on the condition of light that there is.
Select done and lets go and have a look at the from of the camera one more time before we go ahead and take a photograph